
In the last post, I showcased an app based on a neural network, trained on the MNIST dataset using the CrysX-NN library. The app allowed the user to enter their own handwritten digits via mouse/touch screen. Since, the model only employed neural networks without any kind of convolutional layer, the performance was sub-optimal, as one would expect. For instance, the recognition of 1 and 7 was extremely problematic. This was surprising, because the accuracy on the training set was more 98%. This goes to show that the performance on the testing set may not translate that well to the real-world.
However, the lack of a convolutional layer was not the only reason. As I had shown in one of my previous posts, handwritten digit recognition is not perfect, even when using a convolutional neural network, if the model was only trained on the MNIST training set. In that post, I had made the model more robust by adding my own variations of handwritten digits to the MNIST training set. I called this extended MNIST dataset as MNIST_Plus.
Therefore, I also tried to train a simple neural network without any convolutional layer on the MNIST_Plus dataset, and see the real-world performance.
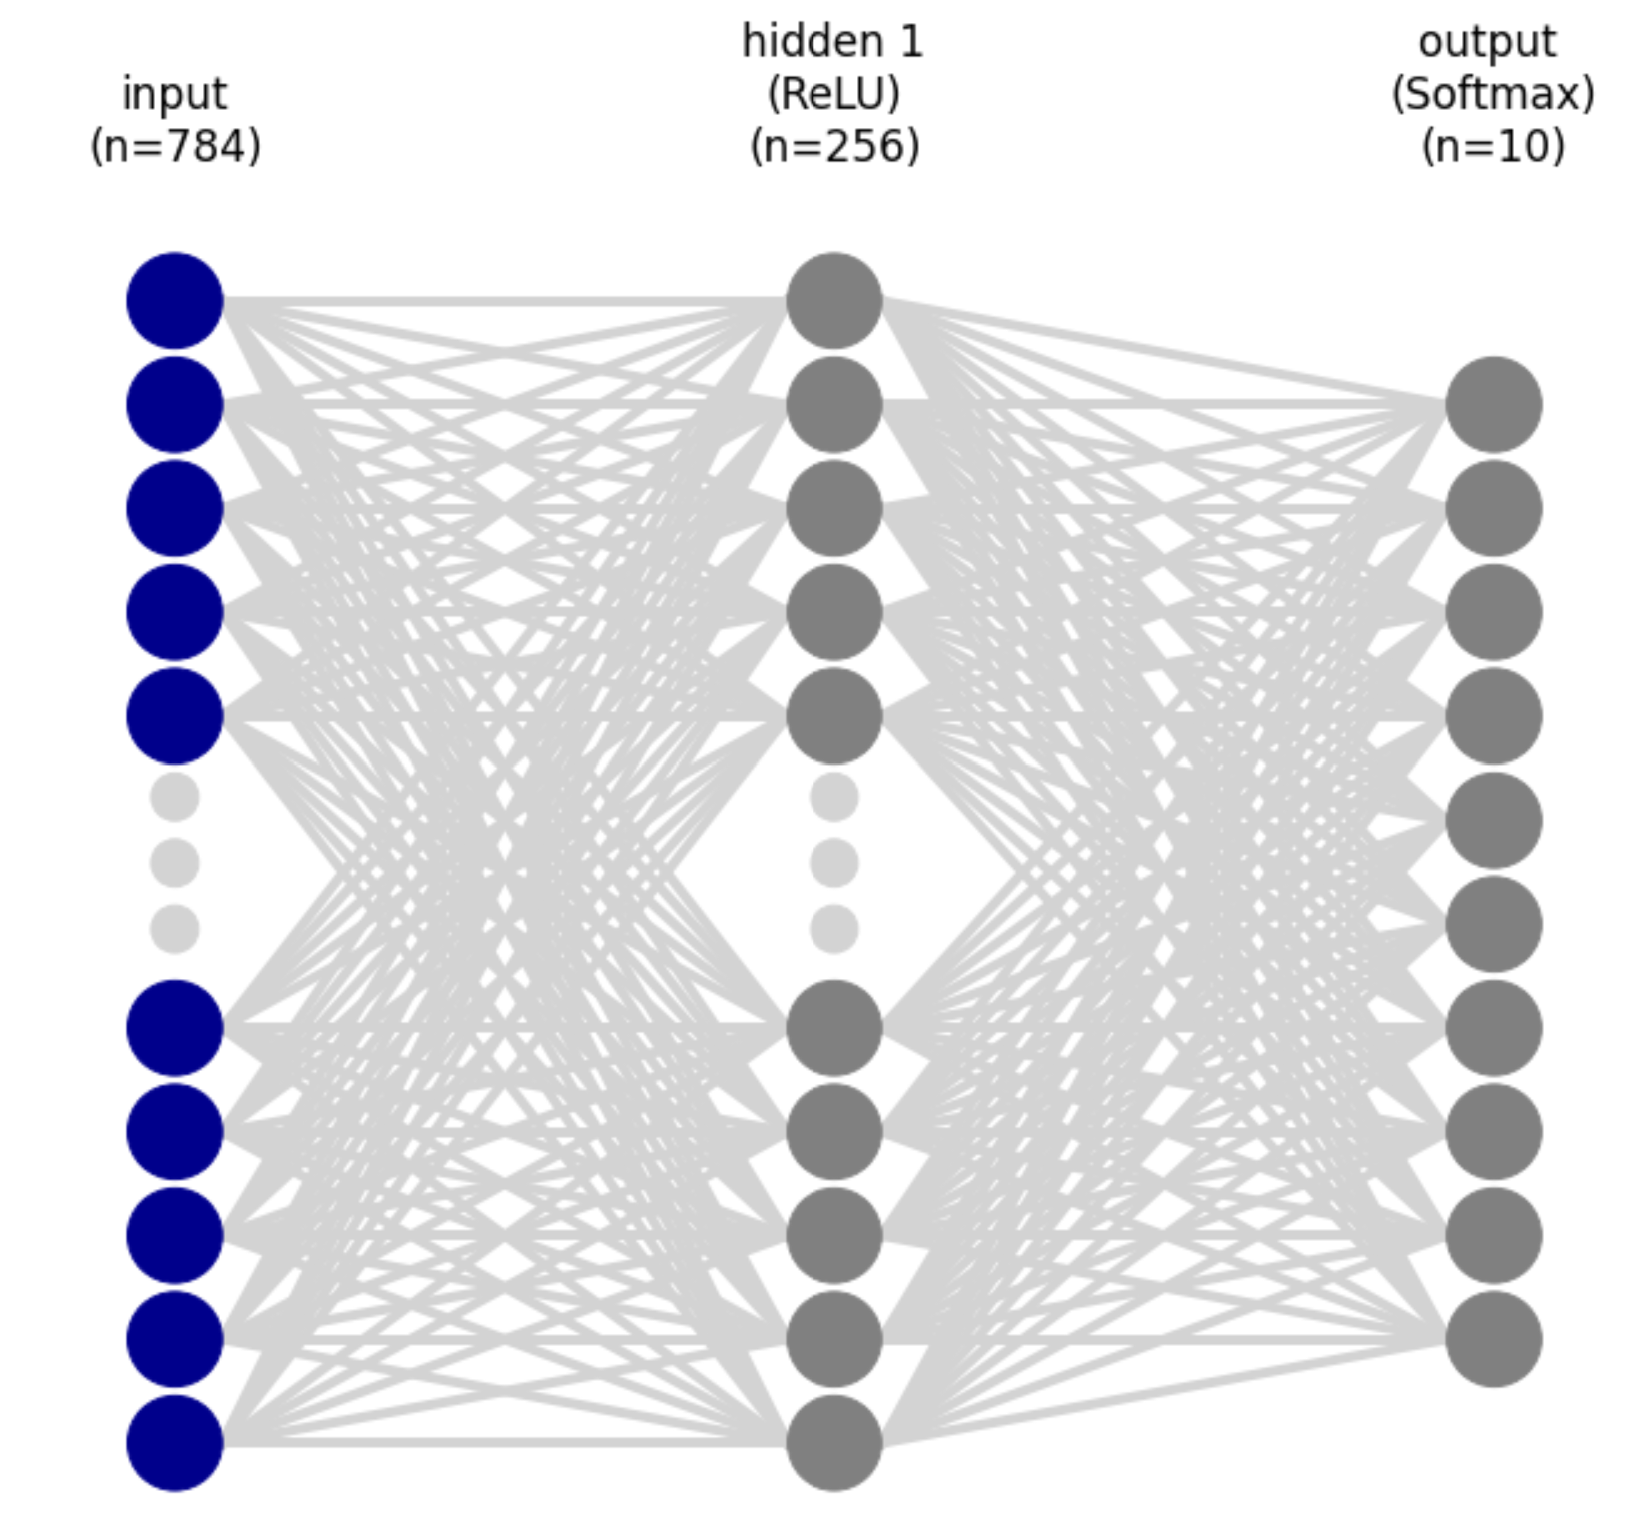
Similar to the last time, the neural network has an input layer of size 784 (28×28 pixels = 784 pixels), 1 hidden layer of size 256 with the ReLU activation function, and finally an output layer of size 10 (for 0-9 digits) with the Softmax activation function to get the probabilities for each digit.
This model didn’t show any significant improvement on the testing MNIST dataset but the real-world performance was now much better.
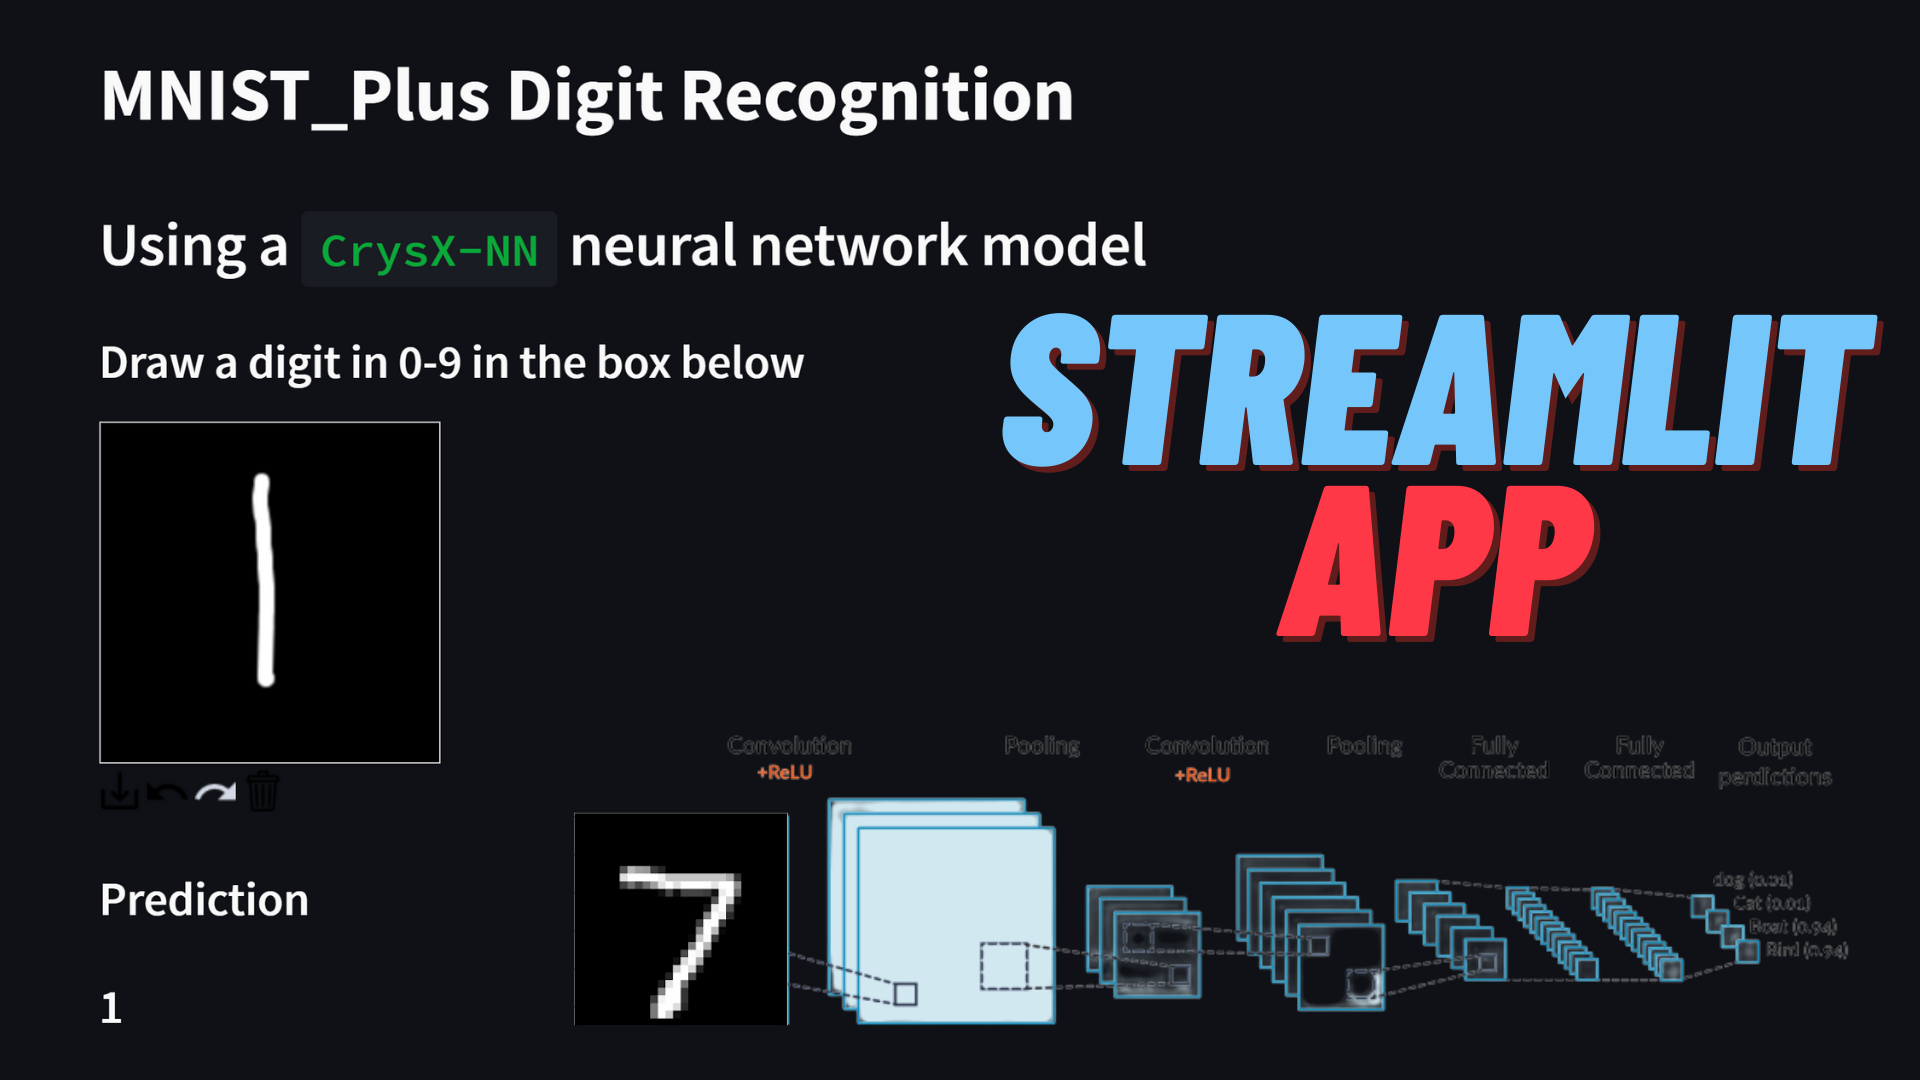
Below is the streamlit app using the model described above trained on MNIST_Plus. You can write a digit using the mouse/touch input. The details of the model and the app are given below the demo.
Streamlit App
https://mnist-plus-crysx.streamlit.app/
The app above is quite neat and also shows what the prediction process looks like.
The user’s handwritten input is captured in a 200×200 pixel box, which is then converted to an image. Subsequently, image processing is done to find a rectangle that completely encompasses the digit blob. Then this rectangular crop of the user input is further processed. Firstly it is converted to grayscale, then resized to a 22×22 image using BILINEAR interpolation. Then a padding of 3 pixels is applied on all the sides of the image to get a 28×28 image. This image still has pixel values in the range of 0-255. These are then normalized by dividing by 255. Then the pixel values are standardized by using the mean and standard deviation of the training MNIST_Plus dataset. Finally, the processed image is passed to the CNN model to make a prediction.
While it still not perfect and slightly inferior to the CNN model, there is a big improvement over the previous post. For example, the prediction of the digit 1 is not improved compared to before, however, it gets recognized as 2 if it has the short bottom line. The prediction is most accurate, if 1 is just drawn as a vertical line or with the top serif. Other than that it performs reasonably well with a few misclassification here and there.
There are two reasons for the bad performance of the MNIST trained model in real-world.
1. We don’t exactly know a lot of pre=processing steps used by those who collected it.
2. Some digits like 6, don’t have a lot of variations in the dataset.
Source code for the app
https://github.com/manassharma07/MNIST-PLUS/blob/main/mnist_plus_NN_crysx_app.py
from streamlit_drawable_canvas import st_canvas
import streamlit as st
import matplotlib.pyplot as plt
import numpy as np
from PIL import Image
import cv2
from crysx_nn import network
@st.cache
def create_and_load_model():
nInputs = 784 # No. of nodes in the input layer
neurons_per_layer = [256, 10] # Neurons per layer (excluding the input layer)
activation_func_names = ['ReLU', 'Softmax']
nLayers = len(neurons_per_layer)
batchSize = 32 # No. of input samples to process at a time for optimization
# Create the crysx_nn neural network model
model = network.nn_model(nInputs=nInputs, neurons_per_layer=neurons_per_layer, activation_func_names=activation_func_names, batch_size=batchSize, device='CPU', init_method='Xavier')
# Load the preoptimized weights and biases
model.load_model_weights('NN_crysx_mnist_plus_98.11_streamlit_weights')
model.load_model_biases('NN_crysx_mnist_plus_98.11_streamlit_biases')
return model
model = create_and_load_model()
st.write('# MNIST_Plus Digit Recognition')
st.write('## Using a <code>CrysX-NN</code> neural network model')
st.write('### Draw a digit in 0-9 in the box below')
<h1>Specify canvas parameters in application</h1>
stroke_width = st.sidebar.slider("Stroke width: ", 1, 25, 9)
realtime_update = st.sidebar.checkbox("Update in realtime", True)
<h1>st.sidebar.markdown("## <a href="https://github.com/manassharma07/crysx_nn">CrysX-NN</a>")</h1>
st.sidebar.write('\n\n ## Neural Network Library Used')
<h1>st.sidebar.image('logo_crysx_nn.png')</h1>
st.sidebar.caption('https://github.com/manassharma07/crysx_nn')
st.sidebar.write('## Neural Network Architecture Used')
st.sidebar.write('1. <strong>Inputs</strong>: Flattened 28x28=784')
st.sidebar.write('2. <strong>Hidden layer</strong> of size <strong>256</strong> with <strong>ReLU</strong> activation Function')
st.sidebar.write('3. <strong>Output layer</strong> of size <strong>10</strong> with <strong>Softmax</strong> activation Function')
st.sidebar.write('Training was done for 10 epochs with Binary Cross Entropy Loss function.')
<h1>st.sidebar.image('neural_network_visualization.png')</h1>
<h1>Create a canvas component</h1>
canvas_result = st_canvas(
fill_color="rgba(255, 165, 0, 0.3)", # Fixed fill color with some opacity
stroke_width=stroke_width,
stroke_color='#FFFFFF',
background_color='#000000',
#background_image=Image.open(bg_image) if bg_image else None,
update_streamlit=realtime_update,
height=200,
width=200,
drawing_mode='freedraw',
key="canvas",
)
<h1>Do something interesting with the image data and paths</h1>
if canvas_result.image_data is not None:
<pre><code># st.write('### Image being used as input')
# st.image(canvas_result.image_data)
# st.write(type(canvas_result.image_data))
# st.write(canvas_result.image_data.shape)
# st.write(canvas_result.image_data)
# im = Image.fromarray(canvas_result.image_data.astype('uint8'), mode=&quot;RGBA&quot;)
# im.save(&quot;user_input.png&quot;, &quot;PNG&quot;)
# Get the numpy array (4-channel RGBA 100,100,4)
input_numpy_array = np.array(canvas_result.image_data)
# Get the RGBA PIL image
input_image = Image.fromarray(input_numpy_array.astype('uint8'), 'RGBA')
input_image.save('user_input.png')
# Convert it to grayscale
input_image_gs = input_image.convert('L')
input_image_gs_np = np.asarray(input_image_gs.getdata()).reshape(200,200)
all_zeros = not np.any(input_image_gs_np)
if not all_zeros:
# st.write('### Image as a grayscale Numpy array')
# st.write(input_image_gs_np)
# Create a temporary image for opencv to read it
input_image_gs.save('temp_for_cv2.jpg')
image = cv2.imread('temp_for_cv2.jpg', 0)
# Start creating a bounding box
height, width = image.shape
x,y,w,h = cv2.boundingRect(image)
# Create new blank image and shift ROI to new coordinates
ROI = image[y:y+h, x:x+w]
mask = np.zeros([ROI.shape[0]+10,ROI.shape[1]+10])
width, height = mask.shape
# print(ROI.shape)
# print(mask.shape)
x = width//2 - ROI.shape[0]//2
y = height//2 - ROI.shape[1]//2
# print(x,y)
mask[y:y+h, x:x+w] = ROI
# print(mask)
# Check if centering/masking was successful
# plt.imshow(mask, cmap='viridis')
output_image = Image.fromarray(mask) # mask has values in [0-255] as expected
# Now we need to resize, but it causes problems with default arguments as it changes the range of pixel values to be negative or positive
# compressed_output_image = output_image.resize((22,22))
# Therefore, we use the following:
compressed_output_image = output_image.resize((22,22), Image.BILINEAR) # PIL.Image.NEAREST or PIL.Image.BILINEAR also performs good
tensor_image = np.array(compressed_output_image.getdata())/255.
tensor_image = tensor_image.reshape(22,22)
# Padding
tensor_image = np.pad(tensor_image, (3,3), &quot;constant&quot;, constant_values=(0,0))
# Normalization should be done after padding i guess
tensor_image = (tensor_image - 0.1307) / 0.3081
# st.write(tensor_image.shape)
# Shape of tensor image is (1,28,28)
# st.write('### Processing steps:')
# st.write('1. Find the bounding box of the digit blob and use that.')
# st.write('2. Convert it to size 22x22.')
# st.write('3. Pad the image with 3 pixels on all the sides to get a 28x28 image.')
# st.write('4. Normalize the image to have pixel values between 0 and 1.')
# st.write('5. Standardize the image using the mean and standard deviation of the MNIST_plus dataset.')
# The following gives noisy image because the values are from -1 to 1, which is not a proper image format
# im = Image.fromarray(tensor_image.reshape(28,28), mode='L')
# im.save(&quot;processed_tensor.png&quot;, &quot;PNG&quot;)
# So we use matplotlib to save it instead
plt.imsave('processed_tensor.png',tensor_image.reshape(28,28), cmap='gray')
# st.write('### Processed image')
# st.image('processed_tensor.png')
# st.write(tensor_image.detach().cpu().numpy().reshape(28,28))
### Compute the predictions
output_probabilities = model.predict(tensor_image.reshape(1,784).astype(np.float32))
prediction = np.argmax(output_probabilities)
top_3_probabilities = output_probabilities[0].argsort()[-3:][::-1]
ind = output_probabilities[0].argsort()[-3:][::-1]
top_3_certainties = output_probabilities[0,ind]*100
st.write('### Prediction')
st.write('### '+str(prediction))
st.write('MNIST_Plus Dataset (with more handwritten samples added by me) available as PNGs at: https://github.com/manassharma07/MNIST-PLUS/tree/main/mnist_plus_png')
st.write('## Breakdown of the prediction process:')
st.write('### Image being used as input')
st.image(canvas_result.image_data)
st.write('### Image as a grayscale Numpy array')
st.write(input_image_gs_np)
st.write('### Processing steps:')
st.write('1. Find the bounding box of the digit blob and use that.')
st.write('2. Convert it to size 22x22.')
st.write('3. Pad the image with 3 pixels on all the sides to get a 28x28 image.')
st.write('4. Normalize the image to have pixel values between 0 and 1.')
st.write('5. Standardize the image using the mean and standard deviation of the MNIST_Plus training dataset.')
st.write('### Processed image')
st.image('processed_tensor.png')
st.write('### Prediction')
st.write(str(prediction))
st.write('### Certainty')
st.write(str(output_probabilities[0,prediction]*100) +'%')
st.write('### Top 3 candidates')
# st.write(top_3_probabilities)
st.write(str(top_3_probabilities))
st.write('### Certainties %')
# st.write(top_3_certainties)
st.write(str(top_3_certainties))
</code></pre>
st.write('### Code used for training the neural network: <a href="https://github.com/manassharma07/crysx_nn/blob/main/examples/NN_MNIST_plus_from_raw_png_crysx.ipynb">Jupyter Notebook</a>')<br />
Pretrained Neural Network weights and biases for the CrysX-NN model
Biases: https://github.com/manassharma07/MNIST-PLUS/blob/main/NN_crysx_mnist_plus_98.11_streamlit_biases.npz
You can download it and load it in your python code using:
model.load_model_weights('NN_crysx_mnist_plus_98.11_weights')
model.load_model_biases('NN_crysx_mnist_plus_98.11_biases')
Code used for training the model
https://github.com/manassharma07/crysx_nn/blob/main/examples/NN_MNIST_plus_from_raw_png_crysx.ipynb
Details of the Neural Network
Optimizer: Stochastic Gradient Descent
Learning Rate = 0.3
Number of epochs = 10
Batch size = 200
Loss function: Categorical Cross Entropy loss
Code snippet for creation and training of Neural network
from crysx_nn import mnist_utils as mu
import numpy as np
<pre><code># Download MNIST_orig and MNIST_plus datasets (May take upto 5 min)
mu.downloadMNIST()
## Load the training dataset from MNIST_orig in memory (May take upto 5 min)
path = 'MNIST-PLUS-PNG/mnist_plus_png'
trainData, trainLabels = mu.loadMNIST(path_main=path, train=True, shuffle=True)
## Normalize within the range [0,1.0]
trainData = trainData/255 # Normalize
trainData_mean = trainData.mean()
trainData_std = trainData.std()
## Standardize the data so that it has mean 0 and variance 1
trainData = (trainData - np.mean(trainData)) / np.std(trainData)
## Convert labels to one-hot vectors
trainLabels = mu.one_hot_encode(trainLabels, 10)
## Flatten the input numpy arrays (nSamples,28,28)-&gt;(nSamples, 784)
trainData = trainData.reshape(trainData.shape[0], 784)
## Let us create a NN using CrysX-NN now
nInputs = 784 # No. of nodes in the input layer
neurons_per_layer = [256, 10] # Neurons per layer (excluding the input layer)
activation_func_names = ['ReLU', 'Softmax']
nLayers = len(neurons_per_layer)
nEpochs = 10
batchSize = 200 # No. of input samples to process at a time for optimization
from crysx_nn import network
model = network.nn_model(nInputs=nInputs, neurons_per_layer=neurons_per_layer, activation_func_names=activation_func_names, batch_size=batchSize, device='CPU', init_method='Xavier')
model.lr = 0.3
## Check the model details
model.details()
model.visualize()
## Optimize/Train the network
inputs = trainData.astype(np.float32)
outputs = trainLabels.astype(np.float32)
# Run optimization
# model.optimize(inputs, outputs, lr=0.3,nEpochs=nEpochs,loss_func_name='CCE', miniterEpoch=1, batchProgressBar=True, miniterBatch=100)
# To get accuracies at each epoch
model.optimize(inputs, outputs, lr=0.3,nEpochs=nEpochs,loss_func_name='CCE', miniterEpoch=1, batchProgressBar=True, miniterBatch=100, get_accuracy=True)
## Error at each epoch
print(model.errors)
## Accuracy at each epoch
print(model.accuracy)
## Save model weights and biases
# Save weights
model.save_model_weights('NN_crysx_mnist_plus_98.11_weights')
# Save biases
model.save_model_biases('NN_crysx_mnist_plus_98.11_biases')
## Load model weights and biases from files
model.load_model_weights('NN_crysx_mnist_plus_98.11_weights')
model.load_model_biases('NN_crysx_mnist_plus_98.11_biases')
## Test data set
path = 'MNIST-PLUS-PNG/mnist_plus_png'
testData, testLabels = mu.loadMNIST(path_main=path, train=False, shuffle=True)
## Normalize within the range [0,1.0]
testData = testData/255. # Normalize
## Standardize the data so that it has mean 0 and variance 1
# Use the mean and std of training data **********
testData = (testData - trainData_mean) / trainData_std
## Convert labels to one-hot vectors
testLabels = mu.one_hot_encode(testLabels, 10)
## Flatten the input numpy arrays (nSamples,28,28)-&gt;(nSamples, 784)
testData = testData.reshape(testData.shape[0], 784)
## Performance on Test data
# Convert to float32 arrays
inputs = testData.astype(np.float32)
outputs = testLabels.astype(np.float32)
predictions, error, accuracy = model.predict(inputs, outputs, loss_func_name='CCE', get_accuracy=True)
print('Error:',error)
print('Accuracy %:',accuracy*100)
</code></pre>
I’m a physicist specializing in computational material science with a PhD in Physics from Friedrich-Schiller University Jena, Germany. I write efficient codes for simulating light-matter interactions at atomic scales. I like to develop Physics, DFT, and Machine Learning related apps and software from time to time. Can code in most of the popular languages. I like to share my knowledge in Physics and applications using this Blog and a YouTube channel.